For a couple months now I have been wanting to add purple highlights to my hair, I have even had the box of dye sitting under my sink since just after Thanksgiving. (Thanks to a sale, I got the dye for 50% off, should have bought more at the time.) I finally decided that if I didn't do it soon, it probably wouldn't get done and soon Spring colors will be back in. So I got off my behind and streaked my hair. I was a little worried that it would come out weird or too bright, but I am quite happy with the end results. The purple is a lot lighter than I expected, but I applied it straight to natural hair so without bleaching before it's not as vivid. A good start, I think. I want to make my hair darker, then add some blonde highlights and purple on top of those...
Friday, January 6, 2012
Apothecary jars- Phase 1
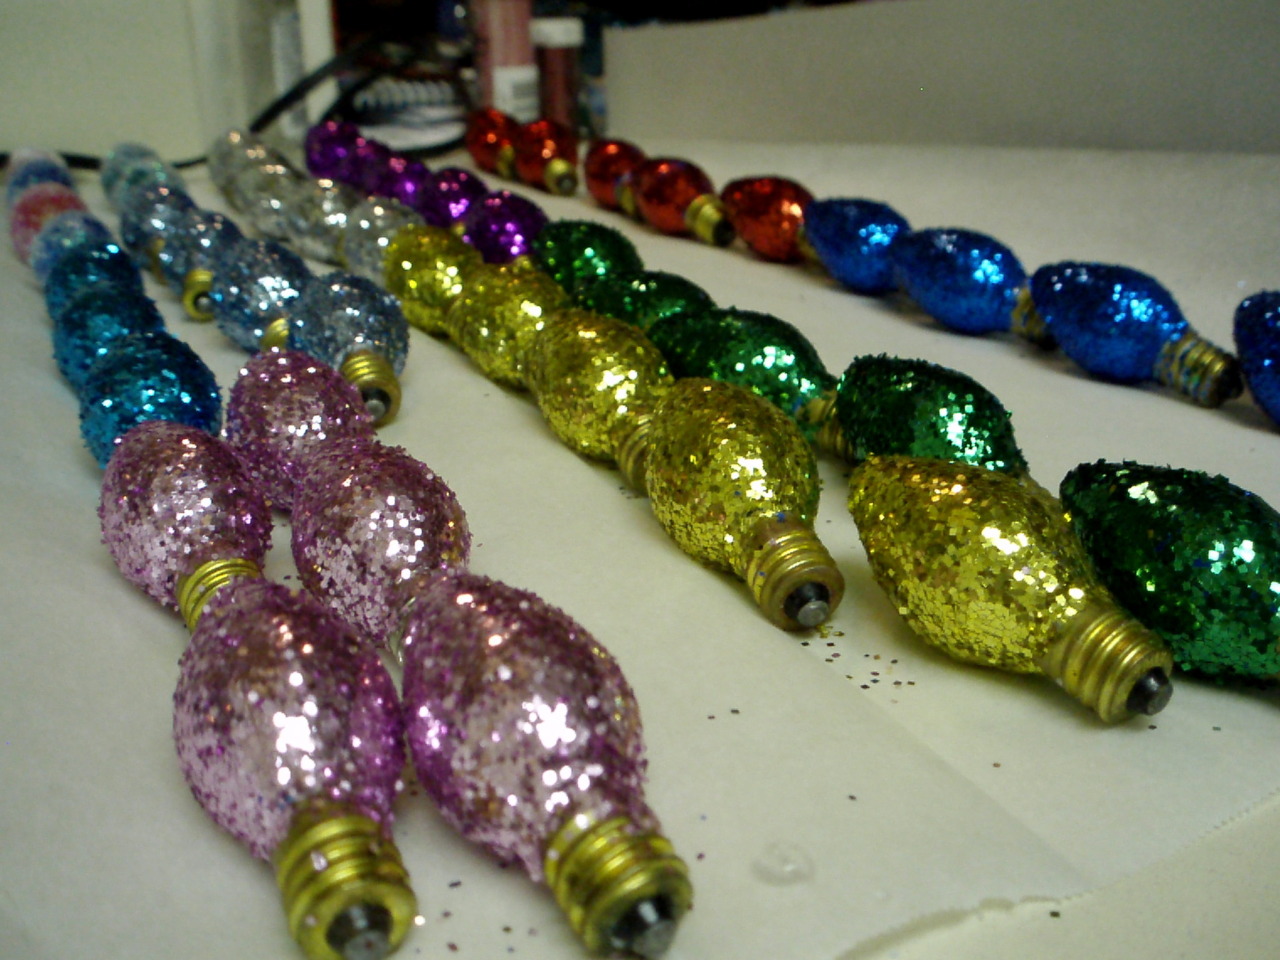
I am officially addicted to Pinterest and as a result of that I see lots of crafts and projects that I want to try myself. One in particular that I saw was for inexpensive apothecary jars. I found the jars at Dollar Tree, along with the decorative sand but wasn’t able to find wood pieces that would support the jars. (By the way, these same hurricane-shaped jars cost nearly $4 at Wal-Mart, I don’t even want to know how much Michael’s would charge!) Nevertheless, I am on a mission to find wood pieces to complete the bases and the lids for these jars. Until then I will just offset the jars. For the middle jar, I used a branch and pine cone from a tree outside my apartment, one jar of decorator’s sand, and one jar. I put the sand in and then arranged used multiple different branch clippings and arrangements to find the one I liked the best. Once I found what worked best, I arranged it with two other jars that I had filled with glitter covered lights and ornaments. For this jar specifically, I only spent a little over $2 with tax and I absolutely love it!
(I originally did this a couple weeks before Christmas, but now that Christmas is over I need to find something else to put in the jars. I also want to finish them by making stands and lids for them.)
| Taken inside my light box/tent so the glass is whited out. |
Snowflakes and Butterflies
For this project, I used a Thrift Store picture frame (which was previously an ugly tan color but I sanded and stained it to match my furniture), old foil-wrapping paper, and some craft tape (I ran out of scotch tape). The frame cost me $1.75 and I have had the wrapping paper for a couple years… When I bought this tape at Michael’s (on sale for like $.60!) I thought that the letters were white, but I’ve discovered, to my pleasant surprise, that they are actually clear. The different font letters, this roll have “J”s and I have a roll with “D”s for my initials, take on the color of whatever paper you place it on. Even though this isn’t seen with the artwork, I love it! The frame I bought had a metal insert that was used as a mat, so I just covered that with the wrapping paper as tightly as I could (foil wrapping paper likes to separate from itself and tends to bubble and wrinkle easily, this one especially but I just love the pattern) then put the frame back together. (There was no glass included, but I think I prefer it without glass.) Voila! Beautiful wall art that cost me less than $5 if you count what little dark brown stain and foil wrapping paper I used in combination with the cost of the frame.
DIY: Headband Storage
I made this from an oatmeal canister, vintage-print duck (not just any brand, actual duck) tape, and a bright blue glitter-ribbon. I wiped out the inside to get rid of any remaining oat residue, selected my tape, and starting wrapping. When I say I selected my tape, I should clarify that I have over 15 different patterned duck tape to choose from that I have collected over time when I see random printed tape in stores. :) I chose the vintage pattern because my room is black and white (I change the color accents) and I have a blanket with a similar pattern but inverted colors. I think this pattern is pretty, classic, and adds a touch of elegance. I chose a dark turquoise glitter ribbon because I really liked the color with the black and white, and what girl doesn't love glitter? I started across the top to secure the lid, and then wrapped from the top edge down. I made sure to start and end in the same spot, so I had one fairly consistent seam, rather than jagged and miscellaneous seams. I didn't measure the pieces before I pulled them off the roll, just remembered how far I pulled my hands apart and tore the pieces off. I put any excess that I had onto the bottom so the pattern is all over the canister, no remaining Quaker's pattern or cardboard. Once it was covered in tape, I eyeball-measured a piece of ribbon long enough to wrap around and create a bow, and then used super glue to secure it along the top. I placed a spot of glue in the back with the seam, one on each side and then when I had the half-knot started for the bow, I glued the middle of that together and then to the canister. I neatly tied the bow and once I was happy with the size and length of the bow, I glued the middle once again and then added more glue around the edge where the ribbon met the tape. I had pictures of the process as I did it, but my computer crashed before I was able to back them up (literally the day after I did the project and cleared the pictures off my camera). So I took pictures of the end project, even used my DIY light box from a previous project as a neutral background. Overall, I love the end result and my boyfriend, Mike, even said that it looks awesome. (He is a tough critic haha) <3
DIY: Light Tent (box, whatever)…
I recycled an apple box from Albertson’s that I previously used to move by cutting out a portion of the sides and covering it in white printer paper. (I had a lot more pictures of the process- which took a lot longer than anticipated- but my computer crashed and I lost all of my pictures. The ones for this craft, plus multiple others that I had just cleared off of my camera. I was bitter about it for about a week, but they are gone and pouting about it won’t change that…)
When cutting out the sides, I measured about an inch and a half from the top and the sides of the box, drew a square (rectangle on the longer sides), and cut out the middle. I would recommend maybe cutting two inches or so from the edge to give it just a little bit of extra support. After cutting the sides, I wrapped white paper over the entire thing (a long process, but worth it in the end), and then covered 3 of the sides with full pieces of the white paper in order to create a background and something for the light to reflect off. The original post where I found this idea (seen first on Pinterest, originally posted at http://www.digital-photography-school.com/how-to-make-a-inexpensive-light-tent ) used fabric for the sides and a piece of Bristol cardboard and curved it on the back of their light tent. Because my box is rectangle, I did not do this, I just covered the sides but I prefer the end result because it gives me a larger area for photographing.I also did not cover the top of the box with anything, so I am able to maneuver my light and get a better angle on certain subjects. I chose not to use fabric because I didn’t have any white sheets that I wanted to cut up for this project and already had a stack of printer paper. I do not have a DSLR like in the original post, but my point-and-shoot does pretty well for itself.
I have since had quite a bit of fun finding things in my house that I can photograph in my light tent. In the first picture, my dog was feeling a bit jealous and got in the way of the first picture I tried to take. For the last couple pictures, I took a black pillow case and laid in flat in the box. This is great for things that are light in color, like silver, white, or glass that is very reflective.
| Apothecary jar: Decorator's sand, pine cone, & branch. |
| My apothecary jars: Glitter covered Christmas lights & ornaments |
| Another DIY: Headband holder from an Oatmeal canister. |
| Another Christmas gift. It smells sooooooo good! |
Subscribe to:
Posts (Atom)